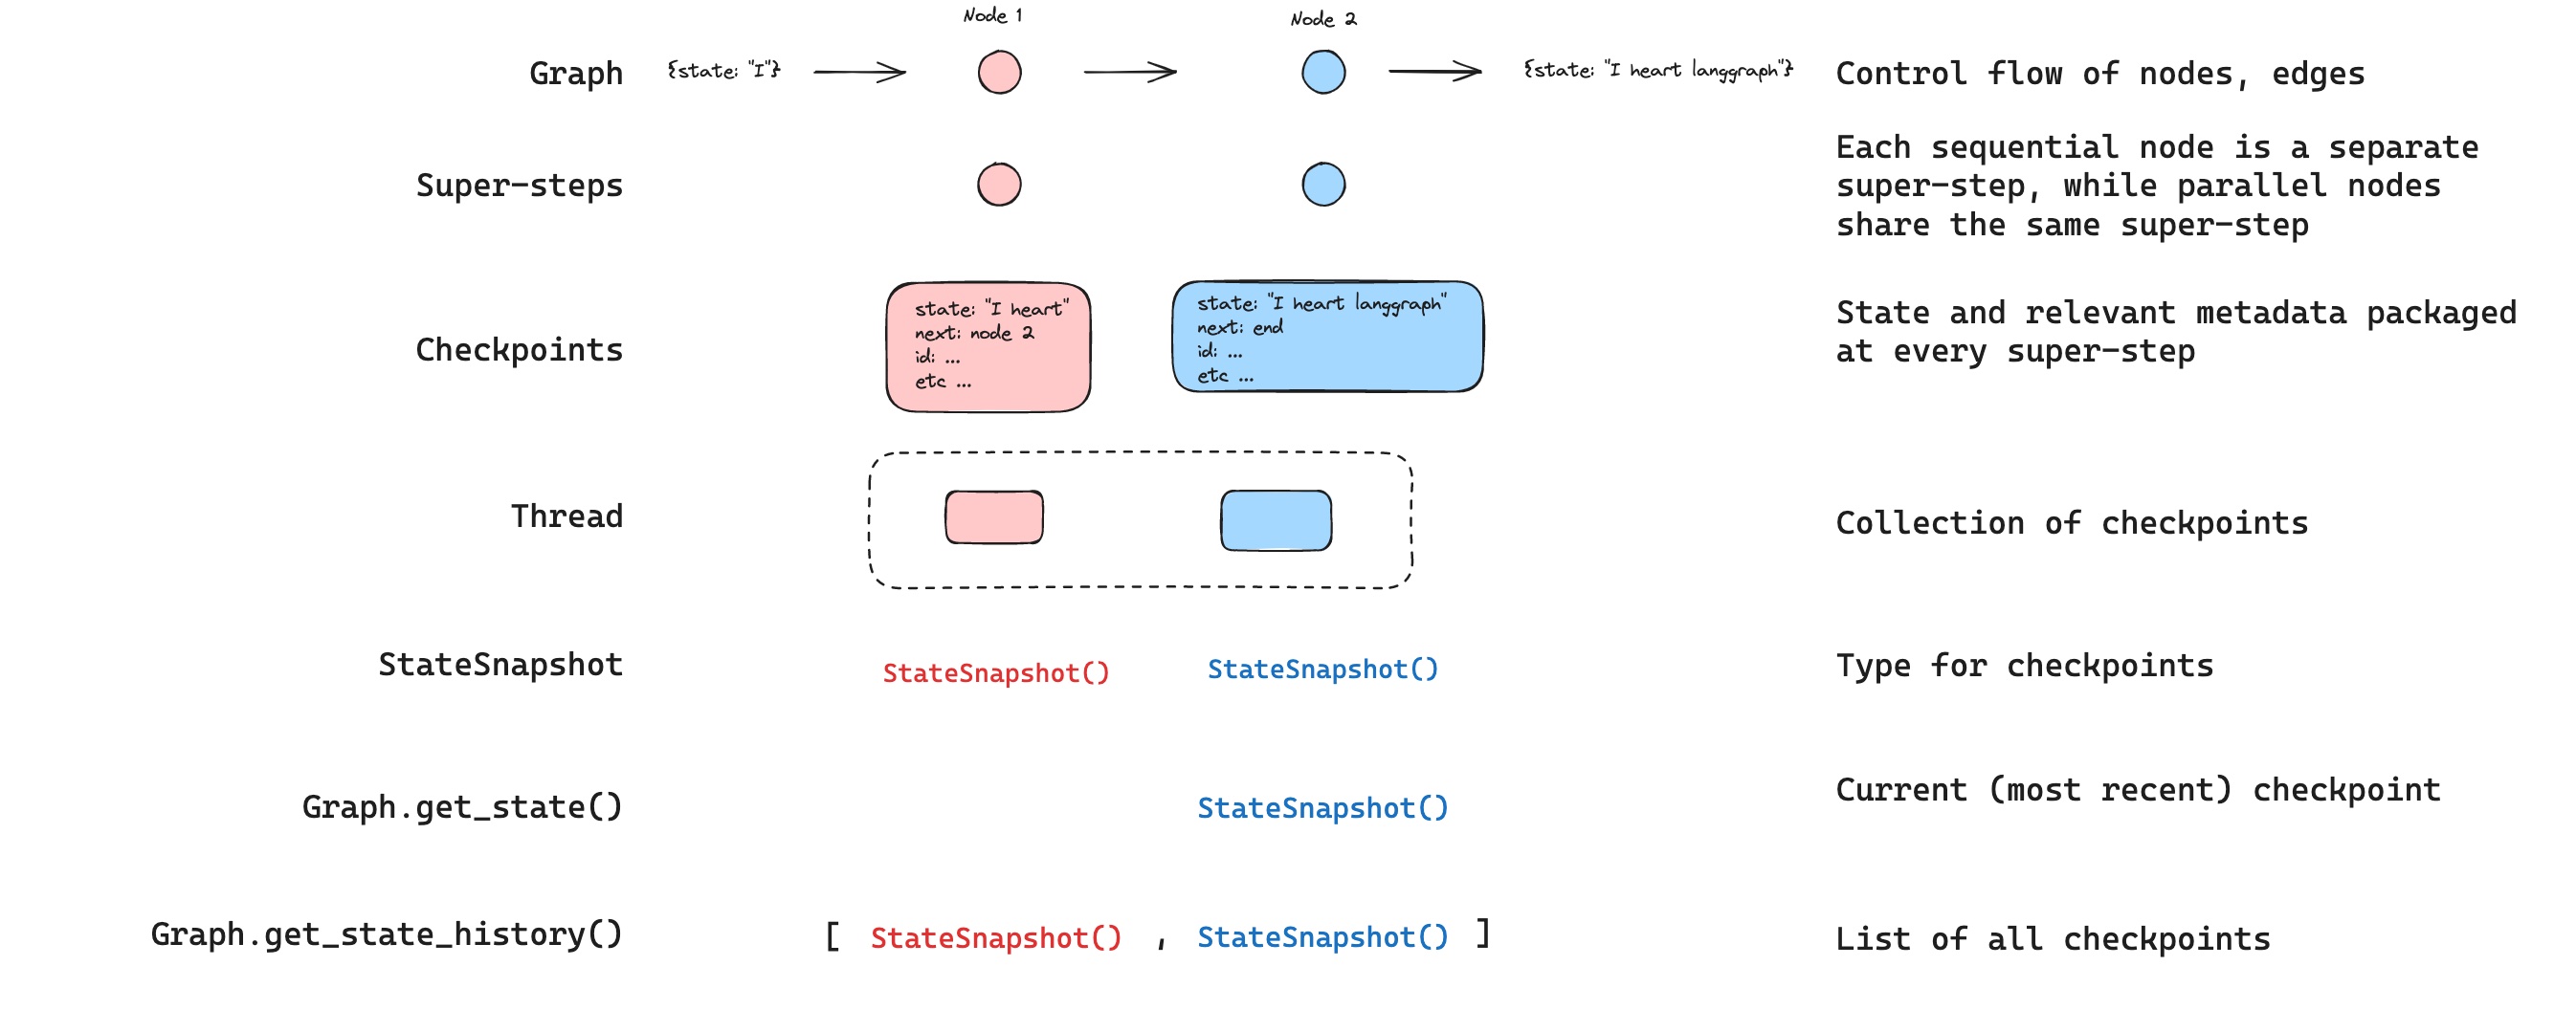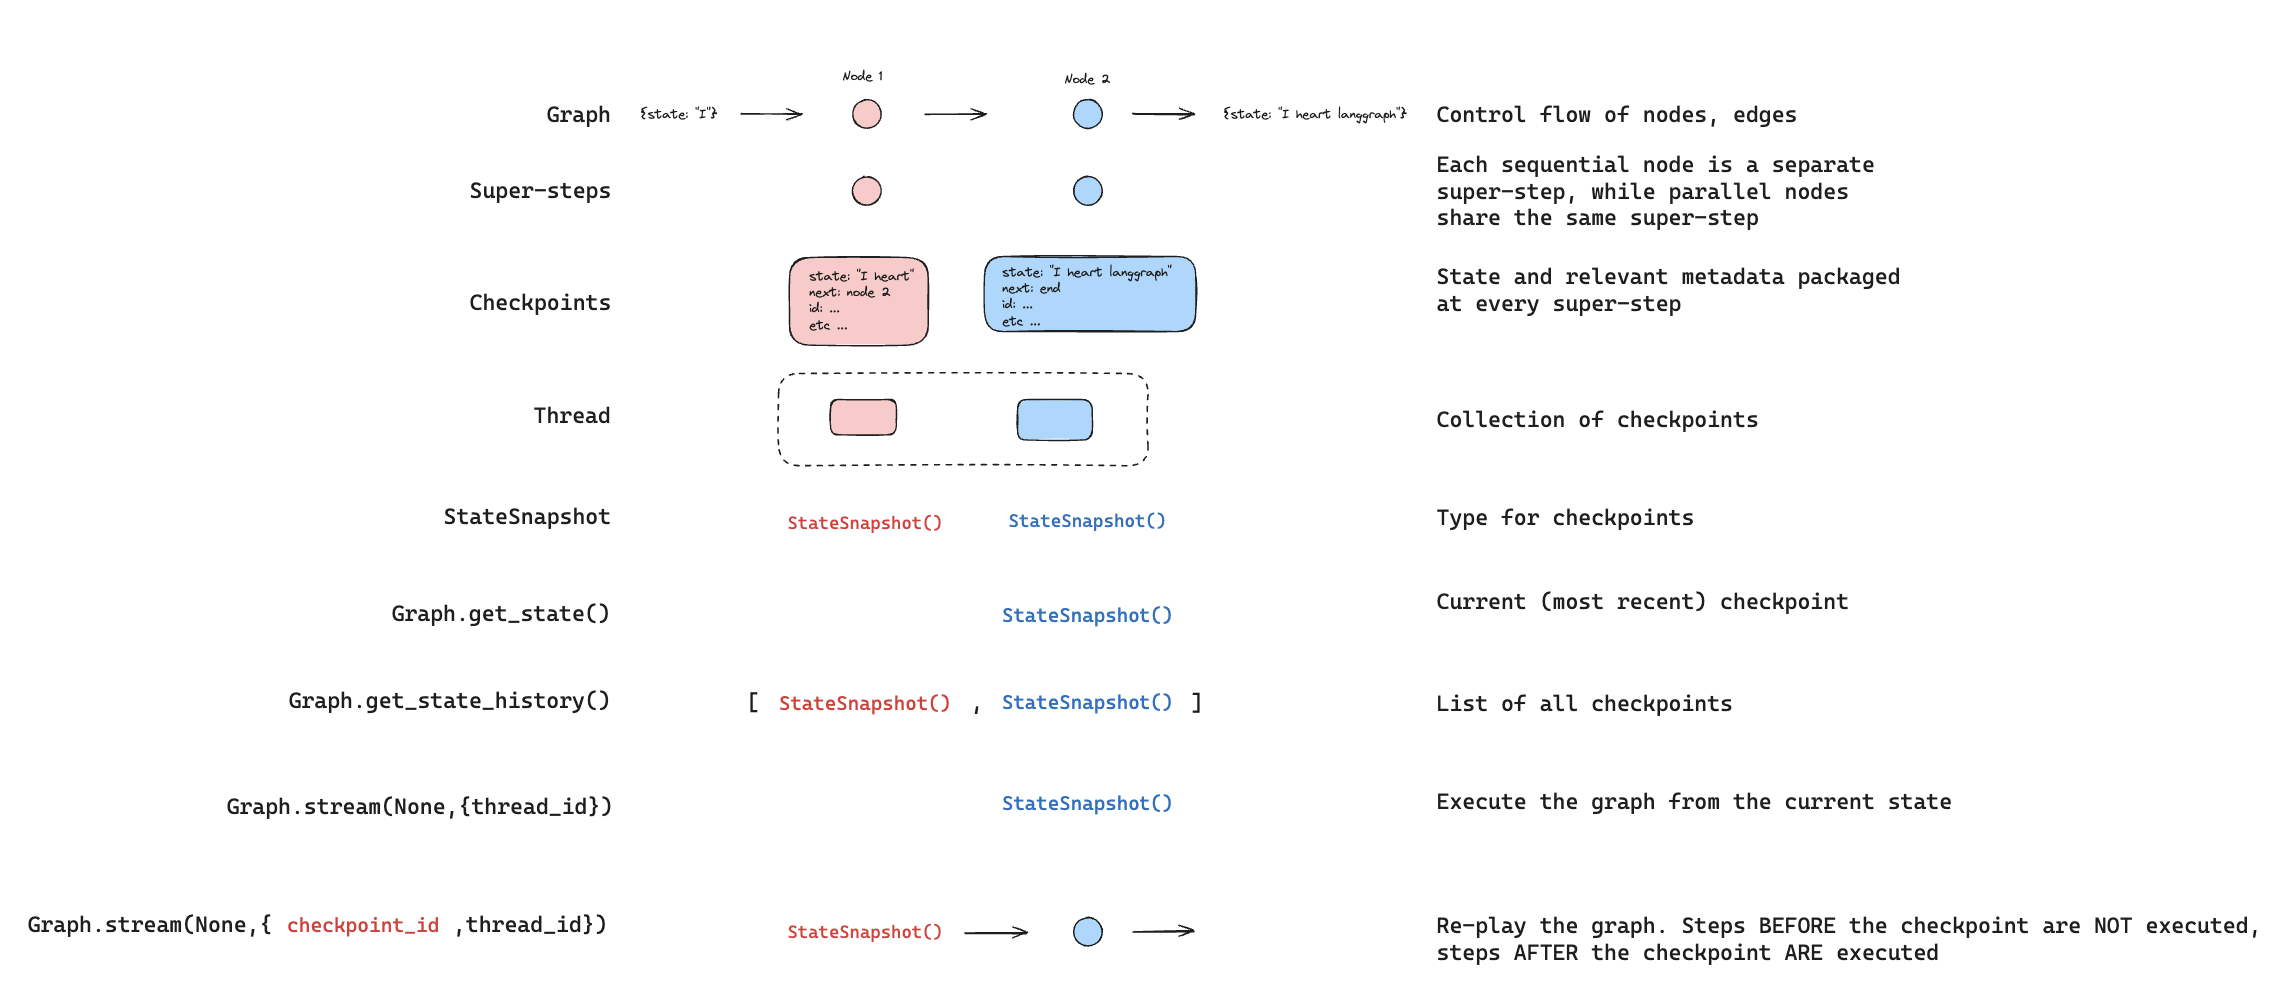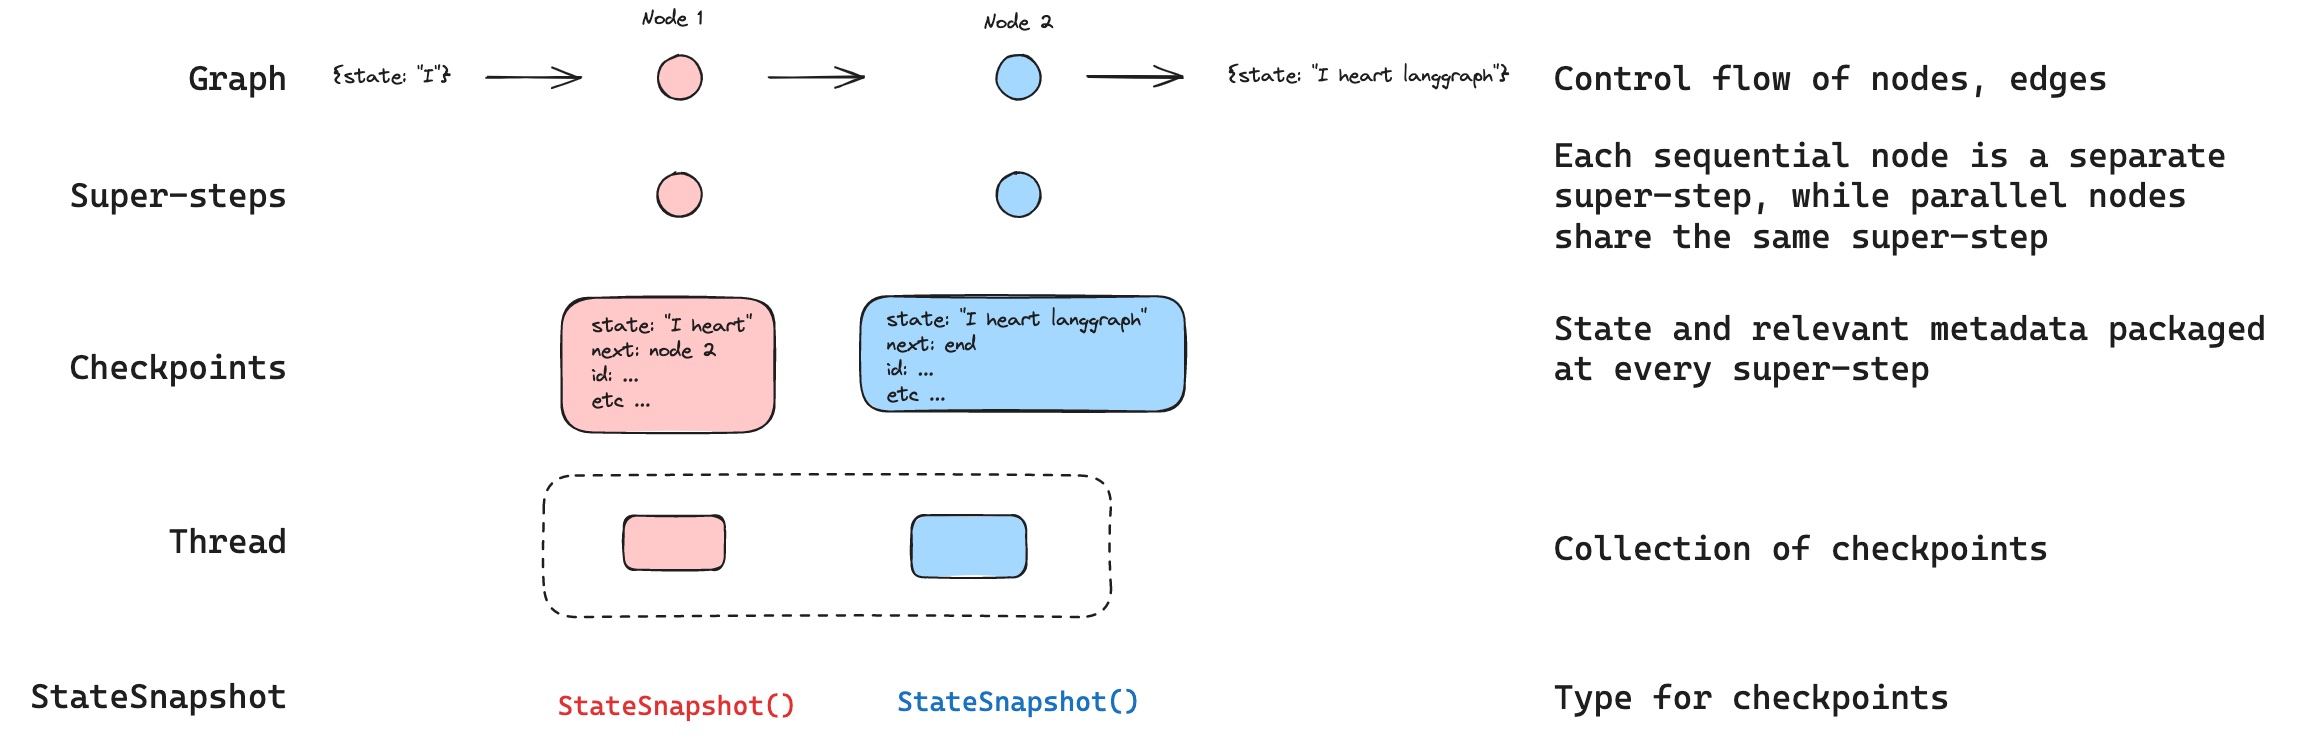
LangGraph 内置了一个持久化层,会将图状态保存为检查点。当你使用检查点保存器编译图时,图状态的快照会在执行的每一步被保存,并按线程组织。这支持人机协作工作流、对话记忆、时间旅行调试以及容错执行。 检查点
Agent Server 会自动处理检查点 使用 Agent Server 时,你不需要手动实现或配置检查点保存器。服务器会在后台为你处理所有持久化基础设施。
使用 LangSmith 跟踪已保存检查点的状态,并调试你的智能体如何跨会话恢复。按照跟踪快速入门完成设置。我们还建议你设置 LangSmith Engine,它可以监控你的跟踪、检测问题并提出修复建议。

为什么使用持久化

以下功能需要持久化:
  • 人机协作:检查点保存器允许人类检查、中断并批准图的步骤,从而支持人机协作工作流。这些工作流需要检查点保存器,因为人必须能够在任意时间点查看图的状态,并且在对状态做出更新后,图必须能够恢复执行。示例请参见 Interrupts
  • 记忆:检查点保存器允许在多次交互之间保留“记忆”。在重复的人类交互场景中(例如对话),任何后续消息都可以发送到同一个线程,该线程会保留之前消息的记忆。有关如何使用检查点保存器添加和管理对话记忆,请参见 Add memory
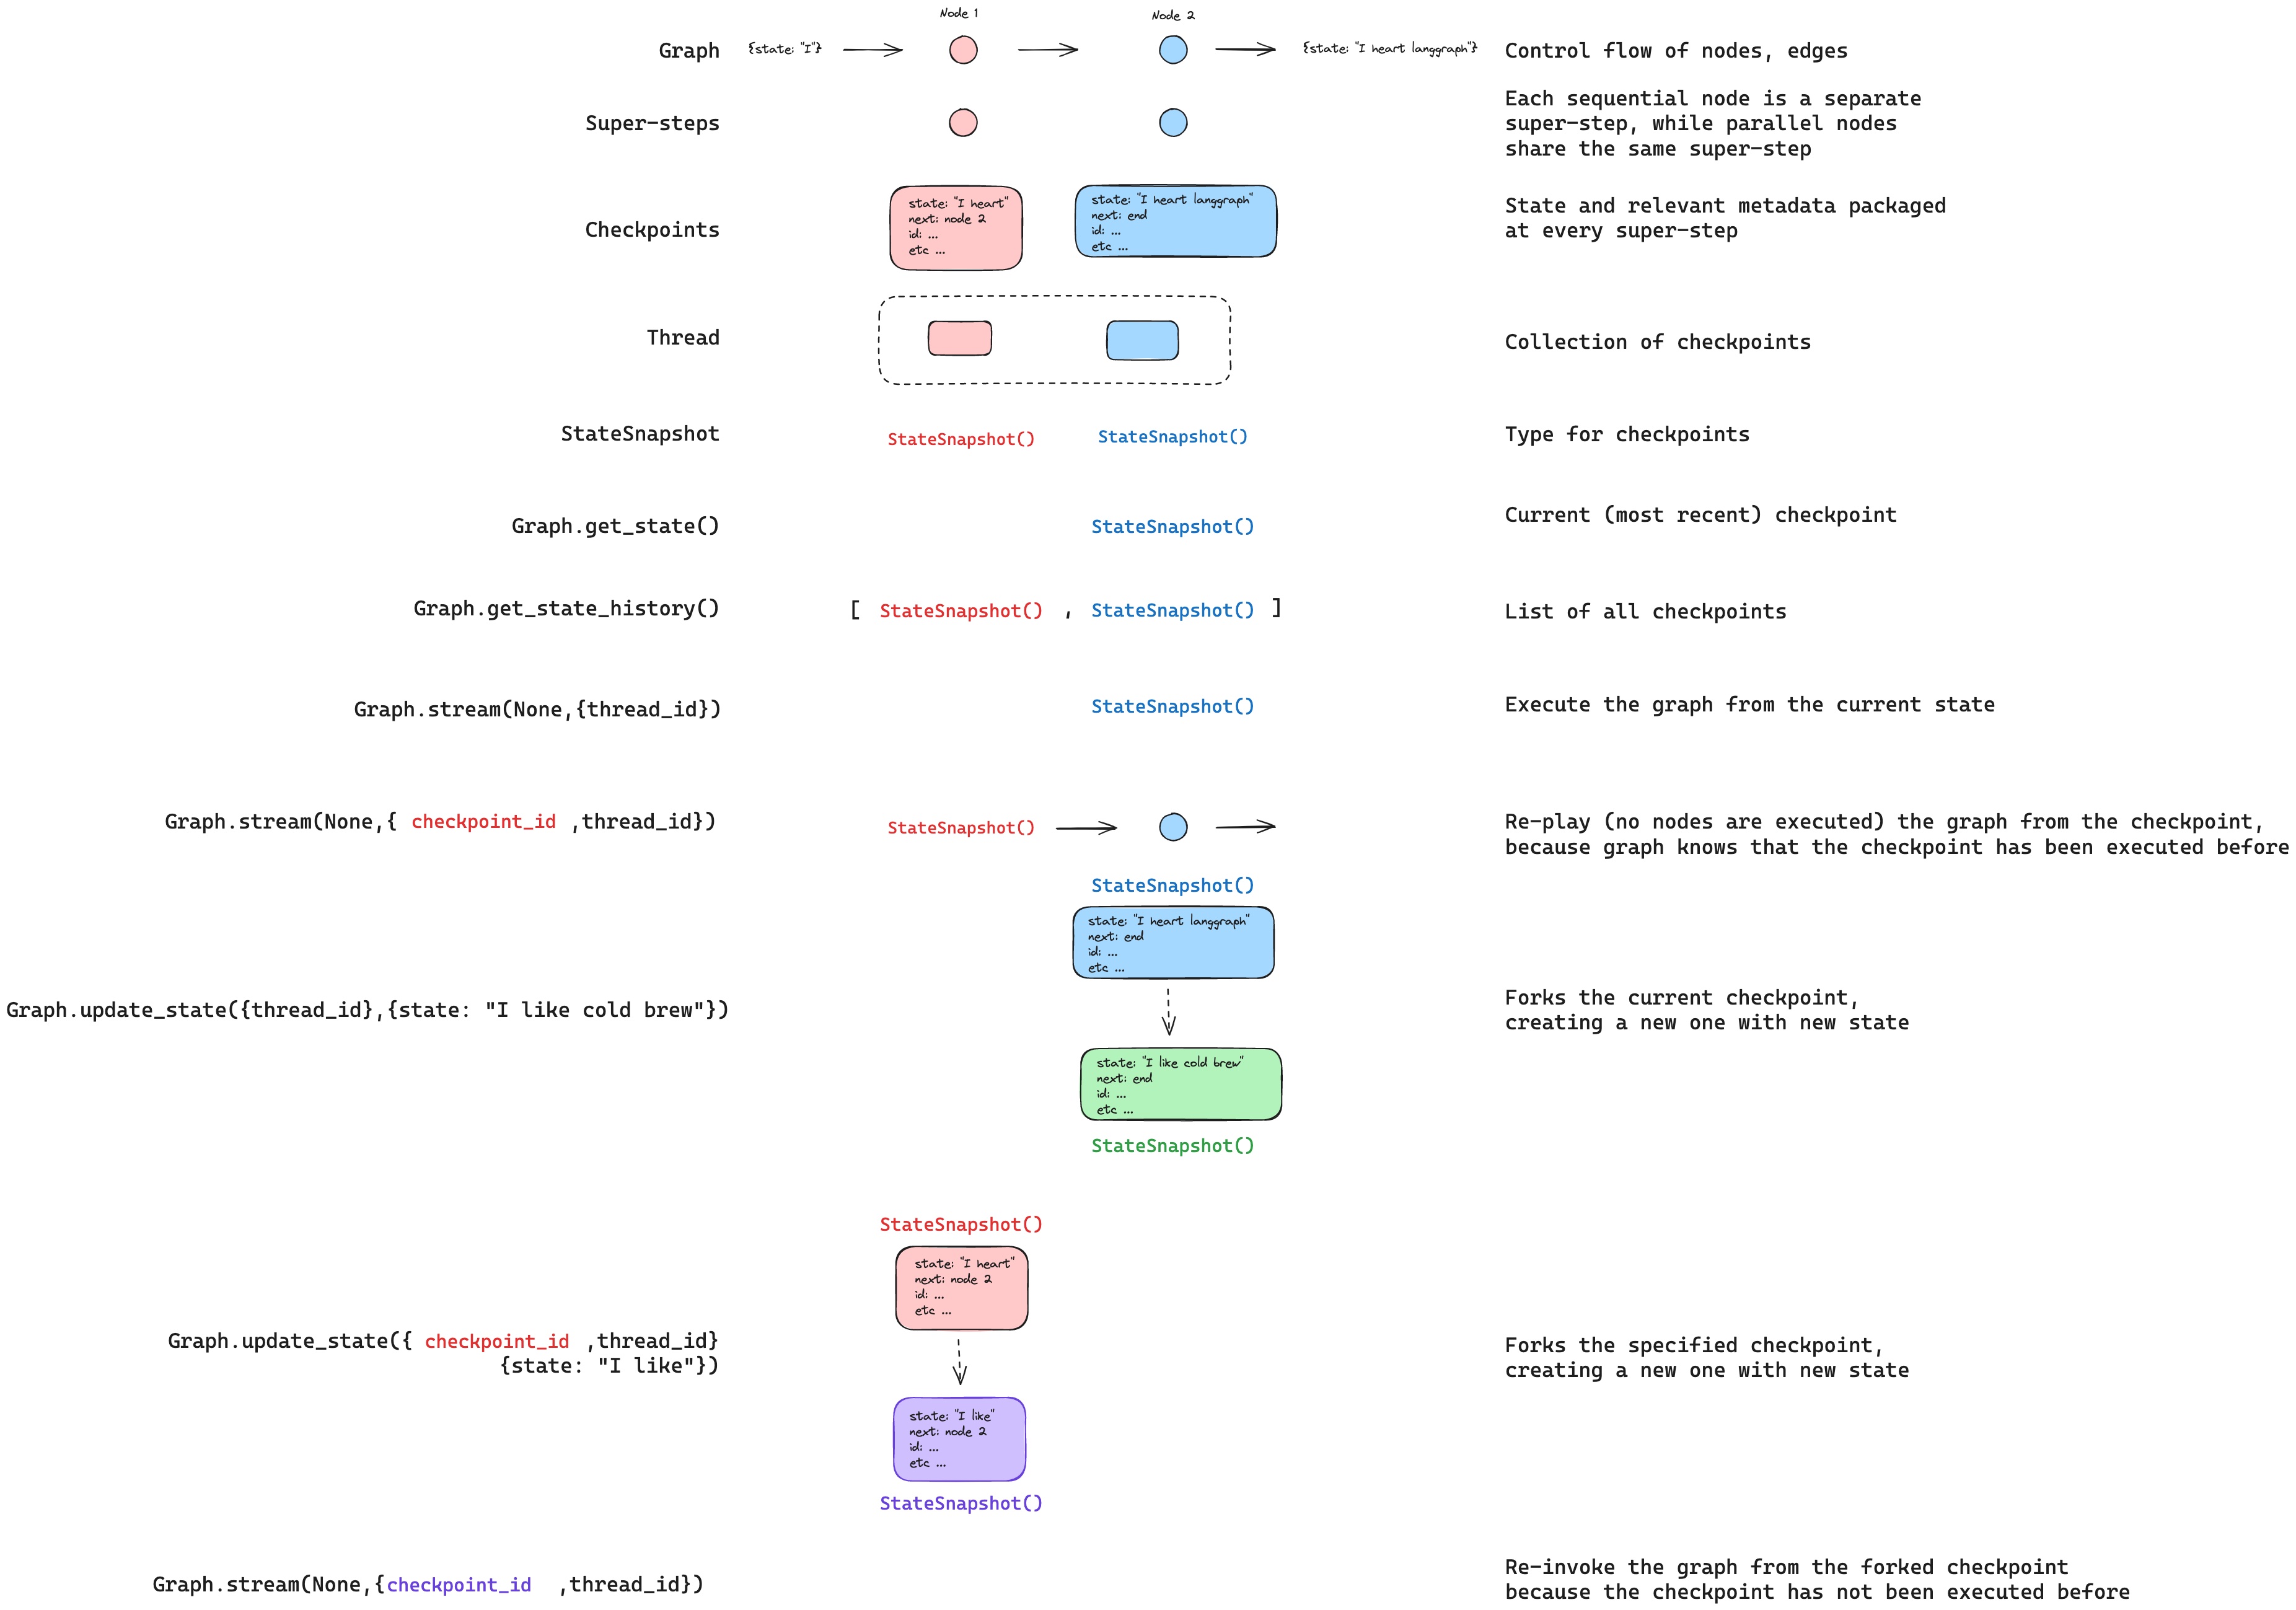
  • 时间旅行:检查点保存器支持“时间旅行”,允许用户重放之前的图执行过程,以便查看和/或调试特定的图步骤。此外,检查点保存器还可以在任意检查点分叉图状态,用于探索不同的执行轨迹。
  • 容错:检查点提供容错和错误恢复能力:如果一个或多个节点在某个给定的超级步骤中失败,你可以从上一个成功步骤重新启动图。
  • 待处理写入:当某个图节点在给定的超级步骤中执行到一半失败时,LangGraph 会存储同一超级步骤中其他已成功完成节点的待处理检查点写入。当你从该超级步骤恢复图执行时,不会重新运行这些已成功的节点。

核心概念

线程

线程是分配给检查点保存器所保存的每个检查点的唯一 ID 或线程标识符。它包含一系列运行累积得到的状态。当执行一次运行时,助手底层图的状态会被持久化到该线程中。 使用检查点保存器调用图时,你必须在配置的 configurable 部分指定 thread_id
{
  configurable: {
    thread_id: "1";
  }
}
可以检索线程的当前状态和历史状态。要持久化状态,必须在执行运行之前创建线程。LangSmith API 提供了多个端点,用于创建和管理线程以及线程状态。更多详情请参见 API reference 检查点保存器使用 thread_id 作为存储和检索检查点的主键。如果没有它,检查点保存器无法保存状态,也无法在中断后恢复执行,因为检查点保存器需要使用 thread_id 加载已保存的状态。

检查点

线程在某个特定时间点的状态称为检查点。检查点是在每个超级步骤保存的图状态快照,并由 StateSnapshot 对象表示(完整字段参考见 StateSnapshot fields)。

超级步骤

LangGraph 会在每个超级步骤边界创建检查点。超级步骤是图的一次“滴答”,在这一步中,所有被调度到该步骤执行的节点都会执行(可能并行执行)。对于像 START -> A -> B -> END 这样的顺序图,输入、节点 A 和节点 B 分别对应不同的超级步骤——每一步之后都会生成一个检查点。理解超级步骤边界对于时间旅行非常重要,因为你只能从检查点(即超级步骤边界)恢复执行。 除了超级步骤检查点之外,LangGraph 还会在节点(任务)级别持久化写入。当超级步骤中的每个节点完成时,它的输出会作为任务条目写入检查点保存器的 checkpoint_writes 表,并关联到正在进行的检查点。这些按任务记录的写入正是实现待处理写入恢复的关键:如果同一超级步骤中的另一个节点失败,已成功节点的写入已经持久化,恢复时无需重新运行。完整状态快照会在超级步骤完成后提交。 LangGraph 还会持久化超级步骤中各个节点执行产生的写入。这些写入会作为任务存储,并用于容错:如果同一超级步骤中的另一个节点失败,恢复时不需要重新计算已成功节点的写入。这些任务写入并不是完整的 StateSnapshot 检查点,因此时间旅行会从超级步骤边界处的完整检查点恢复。 检查点会被持久化,并可用于在之后恢复线程的状态。 让我们看看当如下调用一个简单图时,会保存哪些检查点:
import { StateGraph, StateSchema, ReducedValue, START, END, MemorySaver } from "@langchain/langgraph";
import { z } from "zod/v4";

const State = new StateSchema({
  foo: z.string(),
  bar: new ReducedValue(
    z.array(z.string()).default(() => []),
    {
      inputSchema: z.array(z.string()),
      reducer: (x, y) => x.concat(y),
    }
  ),
});

const workflow = new StateGraph(State)
  .addNode("nodeA", (state) => {
    return { foo: "a", bar: ["a"] };
  })
  .addNode("nodeB", (state) => {
    return { foo: "b", bar: ["b"] };
  })
  .addEdge(START, "nodeA")
  .addEdge("nodeA", "nodeB")
  .addEdge("nodeB", END);

const checkpointer = new MemorySaver();
const graph = workflow.compile({ checkpointer });

const config = { configurable: { thread_id: "1" } };
await graph.invoke({ foo: "", bar: [] }, config);
运行图后,我们预计会看到正好 4 个检查点:
  • 空检查点,START 是下一个要执行的节点
  • 包含用户输入 {'foo': '', 'bar': []} 的检查点,nodeA 是下一个要执行的节点
  • 包含 nodeA 输出 {'foo': 'a', 'bar': ['a']} 的检查点,nodeB 是下一个要执行的节点
  • 包含 nodeB 输出 {'foo': 'b', 'bar': ['a', 'b']} 的检查点,且没有下一个要执行的节点
请注意,bar 通道的值包含来自两个节点的输出,因为我们为 bar 通道设置了 reducer。

检查点命名空间

每个检查点都有一个 checkpoint_ns(检查点命名空间)字段,用于标识它属于哪个图或子图:
  • ""(空字符串):该检查点属于父图(根图)。
  • "node_name:uuid":该检查点属于作为给定节点调用的子图。对于嵌套子图,命名空间会使用 | 分隔符连接(例如 "outer_node:uuid|inner_node:uuid")。
你可以在节点内部通过配置访问检查点命名空间:
import { RunnableConfig } from "@langchain/core/runnables";

function myNode(state: typeof State.Type, config: RunnableConfig) {
  const checkpointNs = config.configurable?.checkpoint_ns;
  // "" for the parent graph, "node_name:uuid" for a subgraph
}
有关处理子图状态和检查点的更多详情,请参见 Subgraphs

获取和更新状态

获取状态

与已保存的图状态交互时,你必须指定线程标识符。你可以调用 graph.getState(config) 查看图的_最新_状态。这会返回一个 StateSnapshot 对象,它对应于配置中提供的线程 ID 关联的最新检查点;如果提供了该线程的检查点 ID,则对应于该检查点 ID 关联的检查点。
// get the latest state snapshot
const config = { configurable: { thread_id: "1" } };
await graph.getState(config);

// get a state snapshot for a specific checkpoint_id
const config = {
  configurable: {
    thread_id: "1",
    checkpoint_id: "1ef663ba-28fe-6528-8002-5a559208592c",
  },
};
await graph.getState(config);
在我们的示例中,getState 的输出大致如下:
StateSnapshot {
  values: { foo: 'b', bar: ['a', 'b'] },
  next: [],
  config: {
    configurable: {
      thread_id: '1',
      checkpoint_ns: '',
      checkpoint_id: '1ef663ba-28fe-6528-8002-5a559208592c'
    }
  },
  metadata: {
    source: 'loop',
    writes: { nodeB: { foo: 'b', bar: ['b'] } },
    step: 2
  },
  createdAt: '2024-08-29T19:19:38.821749+00:00',
  parentConfig: {
    configurable: {
      thread_id: '1',
      checkpoint_ns: '',
      checkpoint_id: '1ef663ba-28f9-6ec4-8001-31981c2c39f8'
    }
  },
  tasks: []
}

StateSnapshot 字段

FieldTypeDescription
valuesobject此检查点处的状态通道值。
nextstring[]接下来要执行的节点名称。空 [] 表示图已完成。
configobject包含 thread_idcheckpoint_nscheckpoint_id
metadataobject执行元数据。包含 source"input""loop""update")、writes(节点输出)和 step(超级步骤计数器)。
createdAtstring创建此检查点时的 ISO 8601 时间戳。
parentConfigobject | null上一个检查点的配置。第一个检查点为 null
tasksPregelTask[]此步骤要执行的任务。每个任务都有 idnameerrorinterrupts,以及可选的 state(使用 subgraphs: true 时的子图快照)。

获取状态历史

你可以调用 graph.getStateHistory(config) 获取给定线程的完整图执行历史。这会返回与配置中提供的线程 ID 关联的 StateSnapshot 对象列表。重要的是,检查点会按时间顺序排列,最新的检查点 / StateSnapshot 位于列表第一项。
const config = { configurable: { thread_id: "1" } };
for await (const state of graph.getStateHistory(config)) {
  console.log(state);
}
在我们的示例中,getStateHistory 的输出大致如下:
[
  StateSnapshot {
    values: { foo: 'b', bar: ['a', 'b'] },
    next: [],
    config: {
      configurable: {
        thread_id: '1',
        checkpoint_ns: '',
        checkpoint_id: '1ef663ba-28fe-6528-8002-5a559208592c'
      }
    },
    metadata: {
      source: 'loop',
      writes: { nodeB: { foo: 'b', bar: ['b'] } },
      step: 2
    },
    createdAt: '2024-08-29T19:19:38.821749+00:00',
    parentConfig: {
      configurable: {
        thread_id: '1',
        checkpoint_ns: '',
        checkpoint_id: '1ef663ba-28f9-6ec4-8001-31981c2c39f8'
      }
    },
    tasks: []
  },
  StateSnapshot {
    values: { foo: 'a', bar: ['a'] },
    next: ['nodeB'],
    config: {
      configurable: {
        thread_id: '1',
        checkpoint_ns: '',
        checkpoint_id: '1ef663ba-28f9-6ec4-8001-31981c2c39f8'
      }
    },
    metadata: {
      source: 'loop',
      writes: { nodeA: { foo: 'a', bar: ['a'] } },
      step: 1
    },
    createdAt: '2024-08-29T19:19:38.819946+00:00',
    parentConfig: {
      configurable: {
        thread_id: '1',
        checkpoint_ns: '',
        checkpoint_id: '1ef663ba-28f4-6b4a-8000-ca575a13d36a'
      }
    },
    tasks: [
      PregelTask {
        id: '6fb7314f-f114-5413-a1f3-d37dfe98ff44',
        name: 'nodeB',
        error: null,
        interrupts: []
      }
    ]
  },
  StateSnapshot {
    values: { foo: '', bar: [] },
    next: ['node_a'],
    config: {
      configurable: {
        thread_id: '1',
        checkpoint_ns: '',
        checkpoint_id: '1ef663ba-28f4-6b4a-8000-ca575a13d36a'
      }
    },
    metadata: {
      source: 'loop',
      writes: null,
      step: 0
    },
    createdAt: '2024-08-29T19:19:38.817813+00:00',
    parentConfig: {
      configurable: {
        thread_id: '1',
        checkpoint_ns: '',
        checkpoint_id: '1ef663ba-28f0-6c66-bfff-6723431e8481'
      }
    },
    tasks: [
      PregelTask {
        id: 'f1b14528-5ee5-579c-949b-23ef9bfbed58',
        name: 'node_a',
        error: null,
        interrupts: []
      }
    ]
  },
  StateSnapshot {
    values: { bar: [] },
    next: ['__start__'],
    config: {
      configurable: {
        thread_id: '1',
        checkpoint_ns: '',
        checkpoint_id: '1ef663ba-28f0-6c66-bfff-6723431e8481'
      }
    },
    metadata: {
      source: 'input',
      writes: { foo: '' },
      step: -1
    },
    createdAt: '2024-08-29T19:19:38.816205+00:00',
    parentConfig: null,
    tasks: [
      PregelTask {
        id: '6d27aa2e-d72b-5504-a36f-8620e54a76dd',
        name: '__start__',
        error: null,
        interrupts: []
      }
    ]
  }
]
状态

查找特定检查点

你可以筛选状态历史,查找符合特定条件的检查点:
const history: StateSnapshot[] = [];
for await (const state of graph.getStateHistory(config)) {
  history.push(state);
}

// Find the checkpoint before a specific node executed
const beforeNodeB = history.find((s) => s.next.includes("nodeB"));

// Find a checkpoint by step number
const step2 = history.find((s) => s.metadata.step === 2);

// Find checkpoints created by updateState
const forks = history.filter((s) => s.metadata.source === "update");

// Find the checkpoint where an interrupt occurred
const interrupted = history.find(
  (s) => s.tasks.length > 0 && s.tasks.some((t) => t.interrupts.length > 0)
);

重放

重放会从之前的检查点重新执行步骤。使用之前的 checkpoint_id 调用图,可以重新运行该检查点之后的节点。检查点之前的节点会被跳过(它们的结果已经保存)。检查点之后的节点会重新执行,包括任何 LLM 调用、API 请求或中断——这些在重放期间始终会被重新触发。 有关重放过去执行过程的完整详情和代码示例,请参见 Time travel 重放

更新状态

你可以使用 graph.updateState() 编辑图状态。这会使用更新后的值创建一个新的检查点——它不会修改原始检查点。该更新会被视为一次节点更新:如果定义了 reducer 函数,值会通过这些函数处理,因此带有 reducer 的通道会_累积_值,而不是覆盖值。 你可以选择指定 asNode,用于控制此次更新被视为来自哪个节点,这会影响下一个要执行的节点。详情请参见 Time travel: asNode 更新

记忆存储

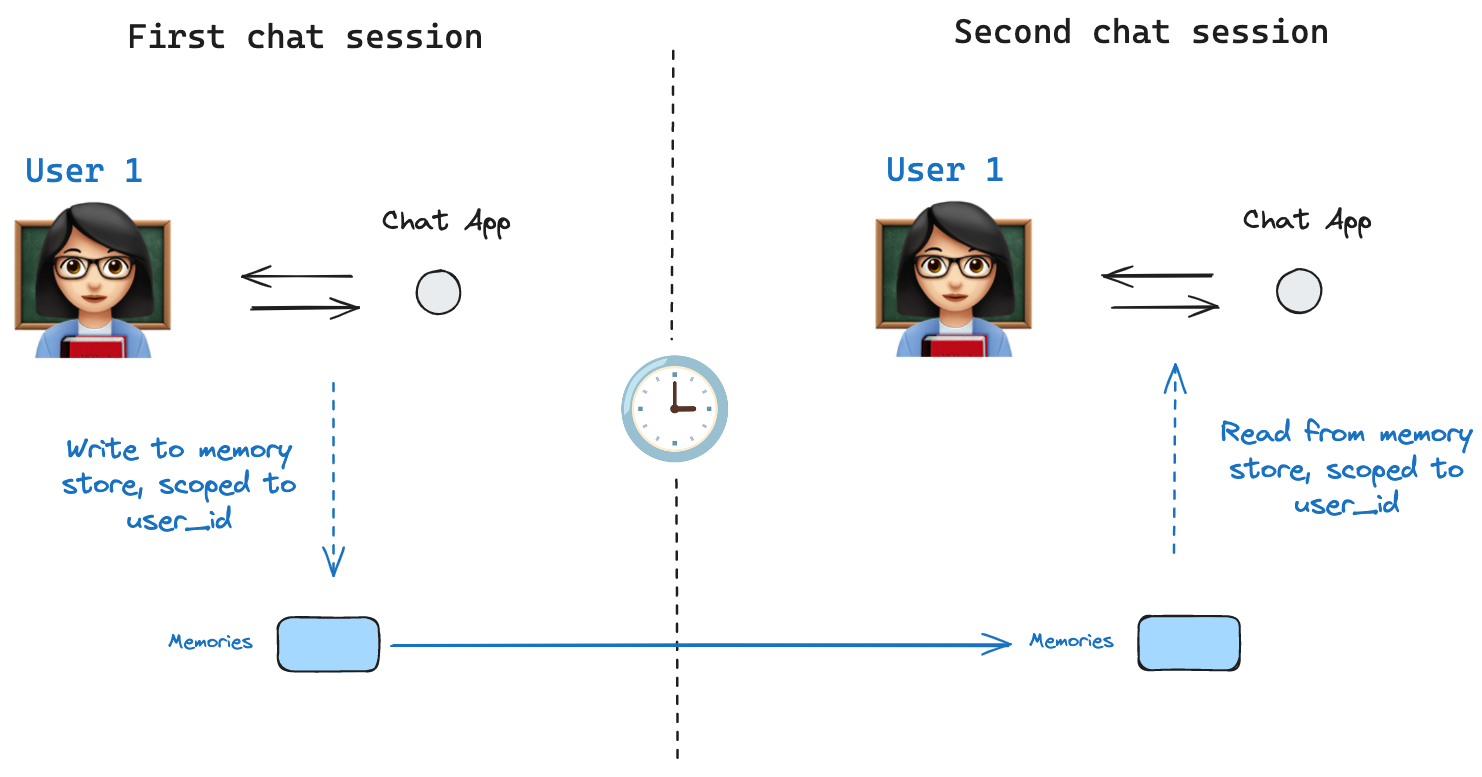
共享状态模型 状态模式指定了一组键,这些键会在图执行过程中被填充。如上所述,状态可以由检查点保存器在每个图步骤写入线程,从而实现状态持久化。 如果我们想在_不同线程之间_保留一些信息,该怎么办?以聊天机器人为例,我们可能希望在该用户的_所有_聊天会话(例如线程)之间保留有关用户的特定信息! 仅使用检查点保存器时,我们无法在线程之间共享信息。因此需要 Store 接口。举例来说,我们可以定义一个 InMemoryStore,用于在线程之间存储用户相关信息。我们只需像之前一样使用检查点保存器编译图,并传入 store。
LangGraph API 会自动处理 store 使用 LangGraph API 时,你不需要手动实现或配置 store。API 会在后台为你处理所有存储基础设施。
InMemoryStore 适合开发和测试。生产环境请使用持久化 store,例如 PostgresStoreMongoDBStoreRedisStore。所有实现都继承自 BaseStore,这是在节点函数签名中应使用的类型注解。

基本用法

首先,我们先在不使用 LangGraph 的情况下单独演示这一点。
import { MemoryStore } from "@langchain/langgraph";

const memoryStore = new MemoryStore();
记忆通过一个 tuple 进行命名空间划分,在这个具体示例中是 (<user_id>, "memories")。命名空间可以是任意长度,也可以表示任何内容,并不一定必须与用户相关。
const userId = "1";
const namespaceForMemory = [userId, "memories"];
我们使用 store.put 方法将记忆保存到 store 中的命名空间。这样做时,我们会指定上面定义的命名空间,以及用于记忆的键值对:键只是该记忆的唯一标识符(memory_id),值(一个字典)就是记忆本身。
const memoryId = crypto.randomUUID();
const memory = { food_preference: "I like pizza" };
await memoryStore.put(namespaceForMemory, memoryId, memory);
我们可以使用 store.search 方法读取命名空间中的记忆,它会返回给定用户的记忆列表,最多返回 limit 参数指定的数量(默认 10)。使用 InMemoryStore 时,条目按插入顺序返回,因此最新的记忆位于列表最后;其他后端的排序可能不同(参见列出命名空间中的条目)。
const memories = await memoryStore.search(namespaceForMemory);
memories[memories.length - 1];

// {
//   value: { food_preference: 'I like pizza' },
//   key: '07e0caf4-1631-47b7-b15f-65515d4c1843',
//   namespace: ['1', 'memories'],
//   createdAt: '2024-10-02T17:22:31.590602+00:00',
//   updatedAt: '2024-10-02T17:22:31.590605+00:00'
// }
它具有的属性包括:
  • value:此记忆的值
  • key:此命名空间中该记忆的唯一键
  • namespace:字符串元组,表示此记忆类型的命名空间
    虽然类型是 tuple,但转换为 JSON 时可能会序列化为列表(例如 ['1', 'memories'])。
  • createdAt:此记忆创建时的时间戳
  • updatedAt:此记忆更新时的时间戳

列出命名空间中的条目

在没有 query 且没有 filter 的情况下调用 store.search,会返回存储在命名空间前缀下的条目,最多返回 limit 个。当你不需要语义排序时,可以用它枚举某个命名空间中的所有内容。
// Return up to 100 items stored under ["alice", "memories"].
const items = await store.search(["alice", "memories"], { limit: 100 });
需要记住三种行为:
  • namespace_prefix 是按前缀匹配,而不是精确匹配。 ("alice",) 也会返回 ("alice", "memories")("alice", "preferences") 等下面的条目。若要限制在单一层级,请传入完整命名空间,或在客户端按 item.namespace 过滤返回的条目。
  • 超过 limit 的结果会被静默截断。 不会有溢出信号——请将 limit 设置得高于预期最大值,或使用 offset 分页。
  • 默认排序取决于 store 后端。 PostgresStoreAsyncPostgresStore 会按 updated_at 降序返回结果(最近更新的在前)。InMemoryStore 会按插入顺序返回结果(最近插入的在后)。不要依赖不同实现之间的特定顺序——如果顺序很重要,请在客户端按 item.updated_at 排序。
要分页遍历大型命名空间:
const pageSize = 50;
let offset = 0;
while (true) {
  const page = await store.search(["alice", "memories"], { limit: pageSize, offset });
  if (page.length === 0) break;
  for (const item of page) {
    // ...
  }
  offset += pageSize;
}
要发现存在哪些命名空间(例如,在列出每个用户的记忆之前先遍历所有用户),请使用 store.listNamespaces
// All namespaces that start with ["alice"], truncated to two levels deep.
const namespaces = await store.listNamespaces({ prefix: ["alice"], maxDepth: 2 });

语义搜索

除了简单检索之外,store 还支持语义搜索,允许你根据含义而不是精确匹配来查找记忆。要启用此功能,请使用嵌入模型配置 store:
import { OpenAIEmbeddings } from "@langchain/openai";

const store = new InMemoryStore({
  index: {
    embeddings: new OpenAIEmbeddings({ model: "text-embedding-3-small" }),
    dims: 1536,
    fields: ["food_preference", "$"], // Fields to embed
  },
});
现在搜索时,你可以使用自然语言查询来查找相关记忆:
// Find memories about food preferences
// (This can be done after putting memories into the store)
const memories = await store.search(namespaceForMemory, {
  query: "What does the user like to eat?",
  limit: 3, // Return top 3 matches
});
你可以通过配置 fields 参数,或在存储记忆时指定 index 参数,来控制记忆中的哪些部分会被嵌入:
// Store with specific fields to embed
await store.put(
  namespaceForMemory,
  crypto.randomUUID(),
  {
    food_preference: "I love Italian cuisine",
    context: "Discussing dinner plans",
  },
  { index: ["food_preference"] } // Only embed "food_preferences" field
);

// Store without embedding (still retrievable, but not searchable)
await store.put(
  namespaceForMemory,
  crypto.randomUUID(),
  { system_info: "Last updated: 2024-01-01" },
  { index: false }
);

在 LangGraph 中使用

完成上述设置后,我们就可以在 LangGraph 中使用 memoryStorememoryStore 与检查点保存器配合工作:如上所述,检查点保存器将状态保存到线程中,而 memoryStore 允许我们存储任意信息,以便_跨_线程访问。我们可以如下同时使用检查点保存器和 memoryStore 编译图。
import { MemorySaver } from "@langchain/langgraph";

// We need this because we want to enable threads (conversations)
const checkpointer = new MemorySaver();

// ... Define the graph ...

// Compile the graph with the checkpointer and store
const graph = workflow.compile({ checkpointer, store: memoryStore });
我们像之前一样使用 thread_id 调用图,同时也传入 user_id,用于像上面展示的那样,把记忆命名空间限定到这个特定用户。
// Invoke the graph
const userId = "1";
const config = { configurable: { thread_id: "1" }, context: { userId } };

// First let's just say hi to the AI
for await (const update of await graph.stream(
  { messages: [{ role: "user", content: "hi" }] },
  { ...config, streamMode: "updates" }
)) {
  console.log(update);
}
你可以通过 runtime 参数在_任何节点_中访问 store 和 userId。下面展示了如何用它保存记忆:
import { StateSchema, MessagesValue, Runtime } from "@langchain/langgraph";

const MessagesState = new StateSchema({
  messages: MessagesValue,
});

const updateMemory: GraphNode<typeof MessagesState> = async (state, runtime) => {
  // Get the user id from the config
  const userId = runtime.context?.user_id;
  if (!userId) throw new Error("User ID is required");

  // Namespace the memory
  const namespace = [userId, "memories"];

  // ... Analyze conversation and create a new memory
  const memory = "Some memory content";

  // Create a new memory ID
  const memoryId = crypto.randomUUID();

  // We create a new memory
  await runtime.store?.put(namespace, memoryId, { memory });
};
如上所示,我们也可以在任何节点中访问 store,并使用 store.search 方法获取记忆。请记住,记忆会以对象列表形式返回,并且可以转换为字典。
memories[memories.length - 1];
// {
//   value: { food_preference: 'I like pizza' },
//   key: '07e0caf4-1631-47b7-b15f-65515d4c1843',
//   namespace: ['1', 'memories'],
//   createdAt: '2024-10-02T17:22:31.590602+00:00',
//   updatedAt: '2024-10-02T17:22:31.590605+00:00'
// }
我们可以访问这些记忆,并在模型调用中使用它们。
const callModel: GraphNode<typeof MessagesState> = async (state, runtime) => {
  // Get the user id from the config
  const userId = runtime.context?.user_id;

  // Namespace the memory
  const namespace = [userId, "memories"];

  // Search based on the most recent message
  const memories = await runtime.store?.search(namespace, {
    query: state.messages[state.messages.length - 1].content,
    limit: 3,
  });
  const info = memories.map((d) => d.value.memory).join("\n");

  // ... Use memories in the model call
};
如果我们创建一个新线程,只要 user_id 相同,仍然可以访问同一批记忆。
// Invoke the graph
const config = { configurable: { thread_id: "2" }, context: { userId: "1" } };

// Let's say hi again
for await (const update of await graph.stream(
  { messages: [{ role: "user", content: "hi, tell me about my memories" }] },
  { ...config, streamMode: "updates" }
)) {
  console.log(update);
}
当我们使用 LangSmith 时,无论是在本地(例如 Studio 中)还是通过 LangSmith 托管,默认都可以使用 base store,并且不需要在图编译期间指定。不过,要启用语义搜索,你确实需要在 langgraph.json 文件中配置索引设置。例如:
{
    ...
    "store": {
        "index": {
            "embed": "openai:text-embeddings-3-small",
            "dims": 1536,
            "fields": ["$"]
        }
    }
}
更多详情和配置选项请参见部署指南

持久性模式

LangGraph 支持三种持久性模式,允许你根据应用需求在性能和数据一致性之间取得平衡。更高的持久性模式会给工作流执行增加更多开销。你可以在调用任何图执行方法时指定持久性模式:
await graph.stream(
  { input: "test" },
  { durability: "sync" }
)
这些持久性模式按持久程度从低到高如下:
  • "exit":LangGraph 仅在图执行退出时持久化更改,无论是成功退出、出错退出,还是由于人机协作中断而退出。这为长时间运行的图提供最佳性能,但意味着中间状态不会被保存,因此你无法从执行中途发生的系统故障(例如进程崩溃)中恢复。
  • "async":LangGraph 会在下一步执行的同时异步持久化更改。这提供了良好的性能和持久性,但如果进程在执行期间崩溃,仍有很小风险导致 LangGraph 没有写入检查点。
  • "sync":LangGraph 会在下一步开始之前同步持久化更改。这确保 LangGraph 在继续执行之前写入每个检查点,提供高持久性,但代价是一定的性能开销。

优化检查点存储

检查点保存器库

在底层,检查点功能由符合 BaseCheckpointSaver 接口的检查点保存器对象提供支持。LangGraph 提供了多种检查点保存器实现,全部通过独立的、可安装的库实现。
  • @langchain/langgraph-checkpoint:检查点保存器的基础接口(BaseCheckpointSaver)以及序列化/反序列化接口(SerializerProtocol)。包含用于实验的内存检查点保存器实现(MemorySaver)。LangGraph 默认包含 @langchain/langgraph-checkpoint
  • @langchain/langgraph-checkpoint-sqlite:使用 SQLite 数据库的 LangGraph 检查点保存器实现(SqliteSaver)。非常适合实验和本地工作流。需要单独安装。
  • @langchain/langgraph-checkpoint-postgres:使用 Postgres 数据库的高级检查点保存器(PostgresSaver),用于 LangSmith。非常适合生产环境使用。需要单独安装。
  • @langchain/langgraph-checkpoint-mongodb:由 MongoDB 支持的高级检查点保存器(MongoDBSaver)和长期记忆 store(MongoDBStore)。该 store 支持跨线程持久化,并可选集成向量搜索。非常适合生产使用。需要单独安装。
  • @langchain/langgraph-checkpoint-redis:使用 Redis 数据库的高级检查点保存器(RedisSaver)。非常适合生产环境使用。需要单独安装。

检查点保存器接口

每个检查点保存器都符合 BaseCheckpointSaver 接口,并实现以下方法:
  • .put - 存储检查点及其配置和元数据。
  • .putWrites - 存储与检查点关联的中间写入(即待处理写入)。
  • .getTuple - 使用给定配置(thread_idcheckpoint_id)获取检查点元组。这用于在 graph.getState() 中填充 StateSnapshot
  • .list - 列出符合给定配置和筛选条件的检查点。这用于在 graph.getStateHistory() 中填充状态历史。